Rear Seat Delete + Platform Build
I wanted a flatter platform in the back of the Highlander so that i could more easily transport stuff around and have a more comfortable sleeping platform for car camping. here are the steps i took to build out a simple, hinging platform that took just a few hours to plan, order, assemble and install.
Rear Seat Delete
The rear seats are simple to remove in a first gen Highlander. just a few bolts on each seat and all are easily accessible you’ll just need a basic socket set. The 60 section of the 60/40 split seat is a bit heavy so id recommend grabbing a friend to help out for this part. I put all the bolts in a bag and store them in my glove box in case i ever want to revert to the stock setup.
There are a few additional bolts to remove the seatbelts
Planning
With the rear seat out, a section of the highlander sub frame was exposed. i planned to use the three holes (outlined in orange) to connect my platform to the car’s frame and hold everything in place.
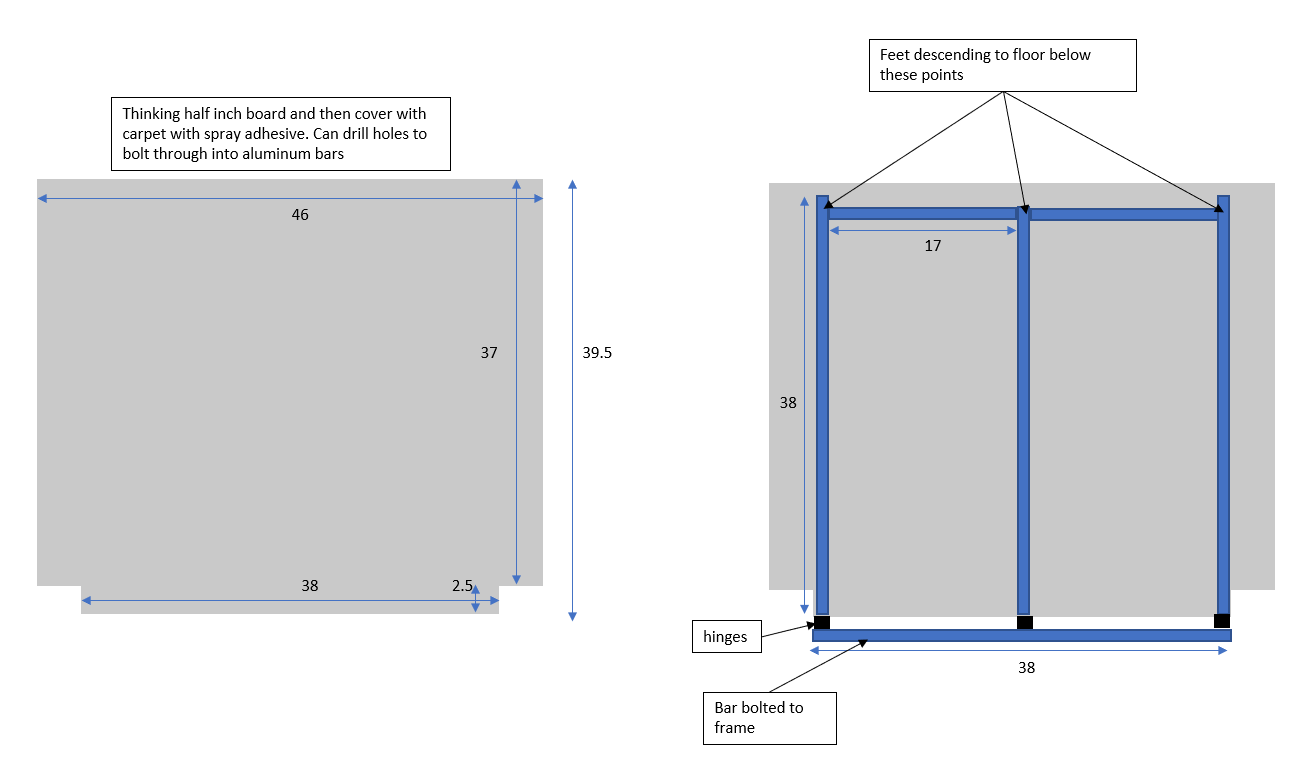
I planned to bolt one bar of 80/20 extrusion directly to the frame and have a platform connected via hinges to make it easier to access anything under the platform for the front section and maintain access to the spare tire for the rear section.
Measurements and materials planning
I decided to use 8020 aluminum for the sub frame and half inch ply for the platform. I also planned to cover the ply in carpet for a softer finish. I made these rough mockups and ordered the aluminum extrusion and asked my sister’s boyfriend for help on cutting the plywood with his CNC machine - If you don’t have access to a CNC a normal jigsaw will work fine to cut the ply down to size
Test Fitting
I test fit the basic components of the 80/20 prior to completing the assembly up in my apartment just to be sure I had measure and ordered the correct parts. The primary bar bolted easily through the three holes i had previously identified and the whole structure fit in place no problem. I took everything out of the car and headed inside for assembly.
Platform Construction
I ordered my 80/20 material in the exact measurements i had mocked up so i had no cutting and the entire assembly came together no problem.
I countersunk bolts through the plywood which then connected into the sliding connectors that fits right into the 80/20 and connected everything together. I then used spray adhesives and tacks on the underside to connect the carpet to the finished assembly.
Finished product for the front section. Rear section to make the whole thing level coming soon!
Final Thoughts
I have another car that i use for normal car stuff so turning the highlander into more of a utility car / camper was something that i planned when I got it. Im really happy with the simplicity of this design and how sturdy it feels


